Difference between revisions of "Extract Data Outputs"
| Line 97: | Line 97: | ||
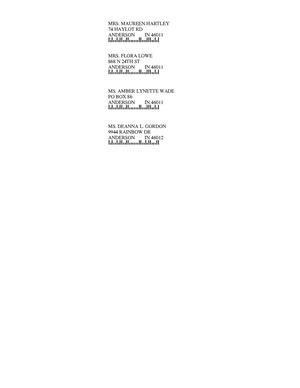
[[File:Output format 6.png]] | [[File:Output format 6.png]] | ||
| + | |||
| + | |||
| + | The data file option allows you to export data into one of three formats - [http://en.wikipedia.org/wiki/Comma-separated_values comma delimited] (the most common), [http://en.wikipedia.org/wiki/Tab-separated_values tab delimited] or [http://en.wikipedia.org/wiki/Flat_file_database fixed length]. You have the following options on this screen: | ||
| + | |||
| + | |||
| + | {| class="wikitable sortable" | ||
| + | |- | ||
| + | ! '''Field''' !! '''Description''' | ||
| + | |- | ||
| + | | '''File format''' || Select the format that you wish your data to be exported in | ||
| + | |- | ||
| + | | '''File name''' || You can type the path and file name, or click the folder icon to select the path and enter the file name | ||
| + | |- | ||
| + | | '''Include field names on first line''' || If you wish to include the field names in the output file, select this box. It is checked by default | ||
| + | |- | ||
| + | | '''Output in uppercase''' || If you wish for the output to be capitalized, select this option | ||
| + | |- | ||
| + | | Include donor fields || Example | ||
| + | |- | ||
| + | | Example || Example | ||
| + | |- | ||
| + | | Example || Example | ||
| + | |- | ||
| + | | Example || Example | ||
| + | |- | ||
| + | | Example || Example | ||
| + | |- | ||
| + | | Example || Example | ||
| + | |- | ||
| + | | Example || Example | ||
| + | |- | ||
| + | | Example || Example | ||
| + | |- | ||
| + | | Example || Example | ||
| + | |- | ||
| + | | Example || Example | ||
| + | |- | ||
| + | | Example || Example | ||
| + | |- | ||
| + | | Example || Example | ||
| + | |} | ||
Revision as of 12:26, 20 March 2012
Contents
Overview of Output Formats Available in the Extract Module
The Extract module provides you with multiple options for extracting data from the DDI Connect system. When you click the drop down arrow next to the Output format field, you will see these options:

Mailing Labels
When you select the Mailing Labels option, you will see this screen:

You have the following options:
| Field | Description |
|---|---|
| Include prefix | If selected, the system will include name prefixes on the labels |
| Include Master ID or PIN | If selected, the system will print the Master ID (accounts) or PIN (constituents) on the labels |
| Capitalize label lines | If selected, the labels will be in all capital letters |
| Abbreviate name lines | If selected, the system will abbreviate certain words, such as "Jr" for Junior, or "Sr" for Senior |
| Abbreviate address lines | If selected, the system will abbreviate certain words, such as "St" for Street, "Ave" for Avenue, etc. |
| Include POSTNET ZIP barcode | If selected, the system will include the POSTNET ZIP barcode on the labels |
| Appeal ID | If you are generating mailing labels for an appeal, and wish to update the recipients' records to show that they received this appeal, you can select it here. Type the appeal ID or click the list icon to display a list of active appeals in the system |
| List code | If you wish to reflect a particular promotion source for the recipients of this extract, you can do so here. Type the promo source code or click the list icon to select from a list of active promo source codes in the system |
| Package | Package can only be used if you selected an Appeal. If you selected an appeal that has packages associated with it, you can indicate that the recipients will be receiving this package. Type the package code or click the list icon to select from a list of packages associated with the appeal |
When you have made your selections, click Start. The system will query all account or constituent records and select those that match the criteria you entered. When the query completes, the system will launch the Envelopes and Labels screen:

Select the options you wish to use for the envelopes or labels. Click below to view a sample of the labels output.
Mail Merge

The Mail Merge option allows you to select an existing word processing form to create a mail merge using the accounts or constituents matching your query parameters. You have the following options on this screen:
| Field | Description |
|---|---|
| WP form code | You can enter the form code, or click the list icon to select from a list of forms set up within the system |
| Capitalize label lines | If selected, the output in the Address lines will be capitalized |
| Abbreviate name lines | If selected, the system will abbreviate certain words, such as "Jr" for Junior, or "Sr" for Senior |
| Abbreviate address lines | If selected, the system will abbreviate certain words, such as "St" for Street, "Ave" for Avenue, etc. |
| Salutation options | Select the salutation format that you wish to use for the merge. Your options for selection are: Formal preferred, Informal preferred, Formal always or Informal always. |
| Appeal ID | If you are generating mailing labels for an appeal, and wish to update the recipients' records to show that they received this appeal, you can select it here. Type the appeal ID or click the list icon to display a list of active appeals in the system |
| List code | If you wish to reflect a particular promotion source for the recipients of this extract, you can do so here. Type the promo source code or click the list icon to select from a list of active promo source codes in the system |
| Package | Package can only be used if you selected an Appeal. If you selected an appeal that has packages associated with it, you can indicate that the recipients will be receiving this package. Type the package code or click the list icon to select from a list of packages associated with the appeal |
When you have finished making your selections, click Start. The system will launch the mail merge. When it is complete, you will want to merge and print the output using the Merge Forms System. The file description will appear as Information Queries in the Merge Print Requests area:

Data File

The data file option allows you to export data into one of three formats - comma delimited (the most common), tab delimited or fixed length. You have the following options on this screen:
| Field | Description |
|---|---|
| File format | Select the format that you wish your data to be exported in |
| File name | You can type the path and file name, or click the folder icon to select the path and enter the file name |
| Include field names on first line | If you wish to include the field names in the output file, select this box. It is checked by default |
| Output in uppercase | If you wish for the output to be capitalized, select this option |
| Include donor fields | Example |
| Example | Example |
| Example | Example |
| Example | Example |
| Example | Example |
| Example | Example |
| Example | Example |
| Example | Example |
| Example | Example |
| Example | Example |
| Example | Example |
| Example | Example |