Cash Requirements Report
Jump to navigation
Jump to search
Overview of AP31
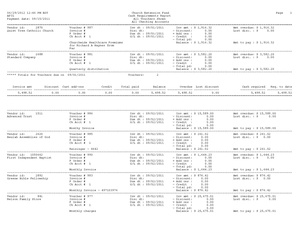
The Cash Requirements Report is a list of all unpaid vouchers/invoices and the amounts designated for them. It also shows the amounts in relation to the checking account balance.
- From the DDI Connect main menu, double-click Accounts Payable
- Double-click Reports
- Double-click Cash Requirements Report. The parameters screen will launch:

The following fields are available on this screen:
| Field | Description |
|---|---|
| Date on which vouchers are to be paid | Enter the date on which the vouchers are due to be paid. You can type it in mm/dd/yyyy format or click the calendar icon to select the date |
| Report format | Select the report format you wish to generate |
| Vendor ID | If you wish to report only on open items for a particular vendor, you can do that here. Type the vendor ID or click the list icon to select from a list of vendors in the system. Leave the field blank to report on all vendors |
| Adjust cash requirements for partial payment amount | Select this option if you wish to include only the partial payment amount. Leave unselected to display the entire amount |
| Adjust cash requirements for unposted checks | To include all checks, even those not yet posted to the general ledger, check this box. Leave it unselected to only include checks that have been posted to the GL |
| Print vendor addresses | If selected, vendor address information will be included on the report output |
Print Options
After clicking the Print Options button you will see the following options. Choose the desired options and click OK to return to the report parameters screen.

| Option | Description |
|---|---|
| Printer | Click the drop down arrow to select from a list of available printers. DDI Connect uses your default printer unless told otherwise |
| Format | Click the drop down arrow to select from a list of available formats. Select paper size, number of columns, and number of rows for printing. Each report has built-in format defaults. Select “Use Defaults” to use the built-in report defaults. The number of rows and columns controls the print size and amount of information per page |
| Memo | If you wish, you can add a memo to the output of the report. NOTE: It is recommended that Word documents be saved with the .docx extension |
| View Report | This option generates a pdf file that is displayed on the screen when the report is generated |
| Archive Report | If this option is selected, the system will archive the report in the DDI Connect report archives. For information on working with archived reports, please reference this page: Archived Report Viewer |
| Print Report | If selected, the system will generate the report output to your default printer. NOTE: You will also receive a pdf version of the report, displayed on your screen |
| Print via PDF | Prints directly to your printer. |
| This option allows you to send a .pdf attachment of the report to the indicated users' email addresses. When OK is clicked, a dialog box will open requesting a recipient | |
| Duplex/Top | Prints the report on both sides of the paper in landscape style. The printer must be capable of printing on both sides or an error will occur |
| Duplex/Side | Prints the report on both sides of the paper in portrait style. The printer must be capable of printing on both sides or an error will occur |
| Green bar | Adds shaded, horizontal bars to the report, making it easier to read across columns |
| No dialog | Selecting this option means that no ‘Report Completed’ dialog will display after the report has been generated |
| Extra copies | If you want extra copies of the report generated, type the number in this field |
Click Start. The system will generate the report based on the parameters you selected, and display the results. Click below to view samples of the three report formats.